Are you facing issues with your beloved Ninja Creami? The ninja creami install light blinking might be just one of many frustrating problems interrupting your homemade ice cream adventures.
The Ninja Creami has revolutionized how we make frozen treats at home, transforming simple ingredients into delicious ice cream, sorbet, gelato, and more with the push of a button. However, even the best kitchen appliances occasionally run into problems that can leave you confused and disappointed.
Whether you’re a new owner or have been creating frozen delights for a while, understanding how to troubleshoot common issues can save you time, money, and frustration.
This comprehensive guide will walk you through the most frequent Ninja Creami problems and provide clear, easy-to-follow solutions that anyone can implement, regardless of technical skill.
Many of the issues you might encounter have simple fixes that don’t require professional help. From blinking lights to icy textures, strange noises to stuck containers, we’ll cover everything you need to know to get your Ninja Creami running smoothly again.
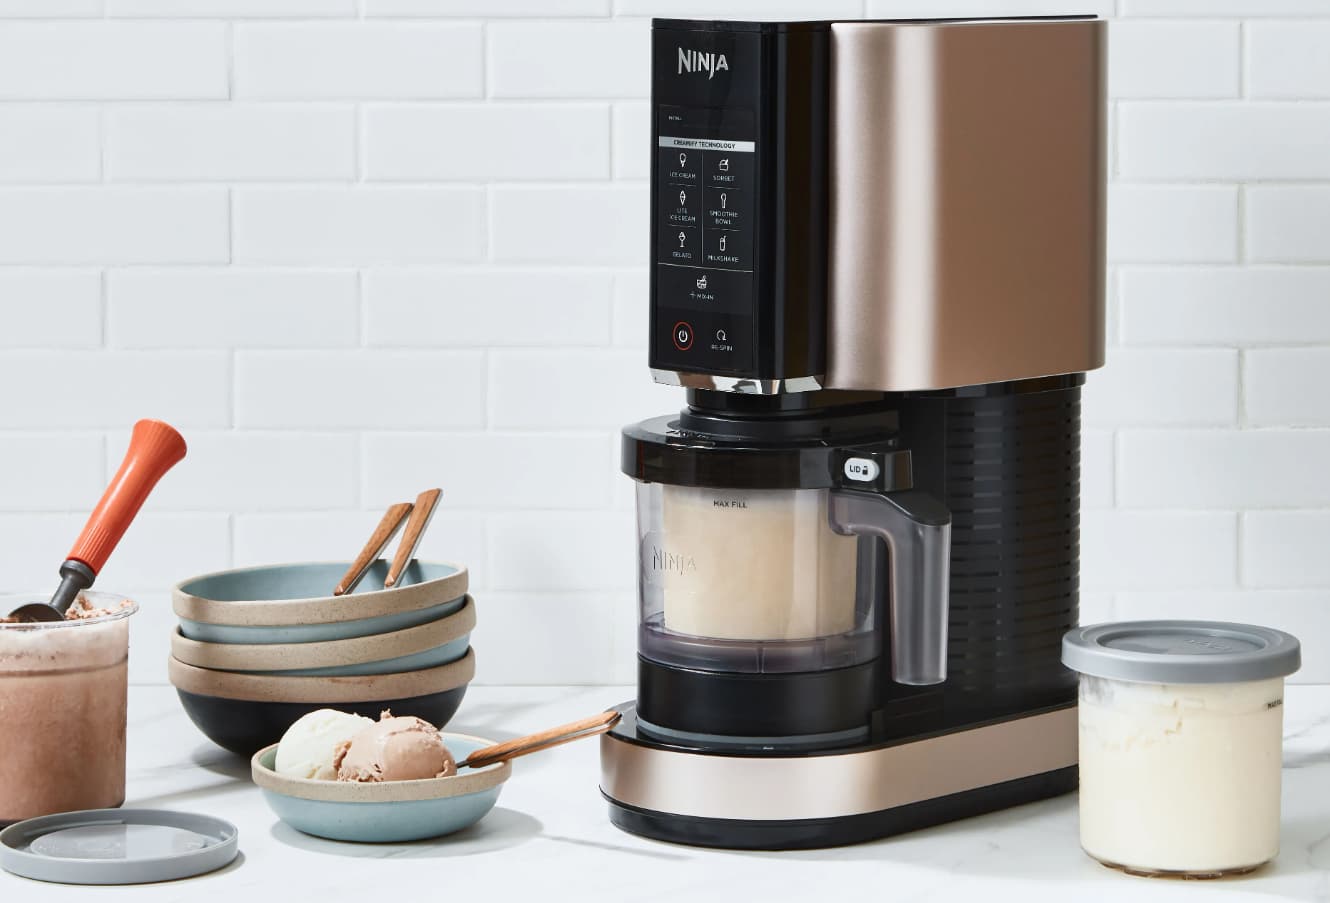
Ninja Creami Install Light Blinking
Let’s dive into the most common problems and their solutions so you can get back to enjoying creamy, delicious frozen treats without the hassle!
Ninja Creami Install Light Blinking – Solution
When your Ninja Creami’s install light starts blinking, it’s trying to tell you something important. This safety feature indicates that components aren’t properly aligned or installed.
Why does this happen?
- Parts aren’t correctly aligned or seated
- The bowl or pint container isn’t locked in place
- The paddle isn’t properly attached to the lid
- Internal sensors are detecting an issue
How to fix it:
- Complete disassembly and reassembly:
- Remove both the outer bowl and pint container
- Check that the paddle is firmly attached to the lid
- Make sure all components are clean and dry
- Reassemble everything, listening for the “click” that signals proper alignment
- Quick fix approach:
- Sometimes, simply releasing and reattaching the bowl solves the problem
- Ensure you hear the click when reattaching components
- Power reset method:
- Unplug the machine completely
- Wait 30 seconds for internal systems to reset
- Plug it back in and try again
- Test with a different outlet if necessary
If the install light continues to blink after trying these steps, contact Ninja Customer Support as there might be an issue with the internal sensors that requires professional attention.
Ninja Creami Won’t Turn On – Solution
A Ninja Creami that won’t power on can be particularly frustrating, but don’t assume your machine is broken before trying these troubleshooting steps.
Common causes:
- Power supply problems
- Safety interlock preventing startup
- Improper assembly
- Internal electrical issues
How to resolve power issues:
- Check electrical connections:
- Ensure the power cord is firmly plugged into both the wall and the machine
- Try a different outlet to rule out circuit problems
- Check if the outlet is controlled by a switch that might be off
- Verify assembly is correct:
- The machine has safety features that prevent startup if the assembly is incorrect
- Make sure the outer bowl is properly seated and locked
- Confirm the lid is securely attached
- Reset the machine:
- Unplug completely for 1-2 minutes
- Plug back in and try powering on again
Important reminder: The Ninja Creami must be turned off after each use. If left on after your last use, it might be in safety shutdown mode, requiring a reset by unplugging.
Blade Not Spinning or Stuck – Solution
When the blade doesn’t move or seems stuck during operation, several factors could be responsible.
Main reasons for stuck blades:
- The mixture is too frozen or hard
- The blade assembly is physically stuck
- Motor issues
- Foreign objects blocking rotation
Step-by-step solutions:
- Thaw your mixture slightly:
- Turn off the machine and remove the outer bowl
- Let your frozen pint sit at room temperature for 5-10 minutes
- This often resolves issues where the mixture is simply too hard
- Free the blade manually:
- Turn off and unplug the machine
- Remove the blade assembly carefully
- Rinse under warm water to remove any frozen residue
- Dry thoroughly before reinstalling
- Use the valve release technique:
- For severely stuck blades, use the valve release mechanism
- This typically frees the blade without requiring complete disassembly
- Apply the Re-spin function:
- For partially processed mixtures causing blade issues
- The Re-spin program is specifically designed to break down harder chunks
Prevention tips:
- Allow frozen mixtures to thaw slightly before processing
- Follow recipe’s liquid-to-solid ratios carefully
- Ensure all parts are completely dry before freezing
Loud Grinding Noise – Solution
Unusual grinding noises during operation indicate something isn’t right with the machine or the ingredients being processed.
Causes of grinding noises:
- Misaligned components
- Hard ingredients in your mixture
- Improperly prepared frozen pint
- Mechanical issues
How to resolve grinding noises:
- Check alignment and assembly:
- Stop the machine immediately when you hear grinding
- Verify the pint container is properly aligned in the outer bowl
- Ensure the outer bowl is correctly locked into the base
- Check that the lid and paddle are secure
- Inspect your mixture:
- Remove any overly hard ingredients, like frozen fruit chunks
- For mix-ins, add them properly using the Mix-In function after initial processing
- Use proper freezing technique:
- Place your pint container flat in the freezer
- Freeze for at least 24 hours before processing
If the grinding noise continues after checking these elements, stop using the machine and contact Ninja Support, as continued use could cause further damage.
Plastic Shavings in Ice Cream – Solution
Finding plastic in your ice cream is concerning and requires immediate attention. This typically indicates damage to some part of your Ninja Creami.
What causes plastic shavings?
- Damaged blade assembly
- Cracked pint container
- Issues with the outer bowl
- Processing extremely hard ingredients
Addressing plastic contamination:
- Stop using it immediately:
- As soon as you notice plastic, stop the machine
- Discard the contaminated batch – do not consume it
- Inspect all components:
- Check the blade assembly for chips or cracks
- Examine the pint container for damage
- Look at the outer bowl for signs of wear
- Inspect the lid and paddle for missing pieces
- Prevention measures:
- Avoid processing extremely hard ingredients
- Never put non-food items in the pint
- Replace worn or damaged parts promptly
Important safety note: If you find plastic in your ice cream, contact Ninja Support for replacement parts. Using damaged components can lead to further contamination and potential health risks.
Powdery or Icy Ice Cream – Solution
If your ice cream has a grainy, powdery, or icy texture, several factors might be contributing to this issue.
Causes of poor texture:
- Insufficient fat content
- Improper freezing time or temperature
- Recipe imbalance
- Processing technique problems
How to fix powdery or icy ice cream:
- Adjust your recipe:
- Increase fat content by using full-fat dairy products
- Add a tablespoon of heavy cream to your mixture
- Include natural emulsifiers like egg yolks
- Proper freezing technique:
- Freeze your base for at least 24 hours
- Ensure your freezer temperature is around 0°F (-18°C)
- Thawing and re-processing:
- Let your frozen pint thaw for 10-20 minutes before processing
- Use the Re-spin function to break down ice crystals
- Quick fix for already processed ice cream:
- Add a splash of milk, cream, or yogurt
- Select Re-spin to incorporate the added liquid
Ice Cream is Too Hard – Solution
Ice cream that’s too firm or hard to enjoy immediately is a common issue with homemade frozen treats.
Reasons for overly hard ice cream:
- The freezer temperature is too cold
- The base mixture has frozen too long
- The recipe contains too little sugar or fat
- Insufficient air incorporation
Solutions for hard ice cream:
- Adjust your freezer settings:
- Ideally, your freezer should be around 0°F (-18°C)
- If colder, your ice cream base may freeze too solid
- Pre-processing preparation:
- Allow your frozen pint to thaw slightly (10-15 minutes)
- Run the container under warm water for 30-60 seconds
- Recipe modifications:
- Increase sugar content slightly (sugar lowers freezing point)
- Add more fat to your base
- Include a tablespoon of alcohol to keep the mixture softer
- Serving suggestions:
- Move ice cream to the refrigerator 10-15 minutes before serving
- Store in a shallow container rather than a deep one
Ice Cream Melts Too Quickly – Solution
Ice cream that turns to soup too fast can be just as frustrating as ice cream that’s too hard.
Why homemade ice cream melts quickly:
- Insufficient fat content
- Over-processing
- Recipe imbalance
- Improper freezing after processing
How to make your ice cream more stable:
- Adjust your recipe:
- Increase fat content with more cream
- Add stabilizers like cornstarch (1 tablespoon per pint)
- Reduce liquid ingredients
- Add protein powder (1-2 tablespoons) for structure
- Processing technique adjustments:
- Avoid excessive Re-spin cycles
- Process only until the desired consistency is reached
- Post-processing steps:
- Immediately return processed ice cream to the freezer for 1-2 hours
- Store at the back of the freezer where the temperature is most stable
| Stabilizer | Amount per Pint | Best For |
|---|---|---|
| Cornstarch | 1 tablespoon | Dairy-based recipes |
| Egg yolks | 2-3 yolks | Custard-style ice cream |
| Protein powder | 1-2 tablespoons | Low-fat options |
| Cream cheese | 2-3 tablespoons | Creamy, rich flavors |
Ninja Creami Won’t Release Pint Container – Solution
A stuck pint container can be frustrating when you’re eager to enjoy your frozen creation.
Common causes for stuck containers:
- Frozen mixture creates suction
- Ice buildup between the container and bowl
- Paddle or blade alignment issues
- Excess moisture freezes solid
Safe removal techniques:
- Wait and warm method:
- Turn off and unplug the machine
- Let it sit at room temperature for 5-10 minutes
- This slight warming often releases the suction
- Gentle rotation technique:
- While holding the outer bowl, gently twist the pint container
- Apply slight upward pressure while twisting
- Warm water trick:
- Dip just the bottom half of the outer bowl in warm water
- Hold for 30 seconds to help release the pain
- Dry thoroughly afterward
Never use tools or excessive force to remove a stuck pint, as this could damage your machine.
Mix-Ins Aren’t Blending Properly – Solution
Getting mix-ins like chocolate chips or cookie dough to distribute evenly can be challenging.
Reasons for uneven mix-ins:
- Incorrect timing of the addition
- Mix-in pieces are too large
- Using the wrong function
- The mixture is too frozen or soft
How to achieve perfectly incorporated mix-ins:
- Follow the correct sequence:
- Process your base completely first
- Add mix-ins only after initial processing
- Use the dedicated “Mix-In” function
- Prepare mix-ins properly:
- Cut into small, uniform pieces (¼ inch or smaller)
- Use mini chips rather than large chunks
- Keep cookie dough or brownie pieces at room temperature
- Quantity considerations:
- Don’t exceed ½ cup of mix-ins per pint
- Distribute evenly across the top before processing
Error Messages on Display – Solution
Error messages on your Ninja Creami’s display can help pinpoint specific issues.
Common error messages and solutions:
- E01 – Motor Overload:
- Cause: Mixture too frozen or hard
- Solution: Allow the pint to thaw for 10-15 minutes and restart
- E02 – Thermal Cutoff:
- Cause: The Machine has overheated
- Solution: Turn off, unplug, and allow to cool for 30 minutes
- E03 – System Error:
- Cause: Internal system malfunction
- Solution: Power cycle (unplug for 2 minutes) and restart
General error troubleshooting:
- Turn off and unplug immediately
- Wait several minutes before reconnecting
- Reassemble components carefully
- If errors persist, contact Ninja Support
Leaks During Processing – Solution
Leaking during the processing cycle can create a mess and affect your results.
Causes of leaking:
- Overfilled pint container
- The mixture was not properly frozen
- Damaged seals
- Improper assembly
Solutions for leaking issues:
- Proper filling technique:
- Never fill above the “MAX FILL” line
- Leave ½ inch of space at the top
- Remember that liquids expand when frozen
- Ensure complete freezing:
- Freeze your base for at least 24 hours
- Check that the mixture is frozen solid throughout
- Check seals and components:
- Inspect the rubber gasket on the lid
- Examine the pint container for damage
- Verify the outer bowl is intact
Overheating or Burnt Smell – Solution
A burnt odor or unusual heat during operation indicates a potentially serious issue.
Causes of overheating:
- Processing overly frozen mixtures
- Extended continuous use
- Blocked ventilation
- Motor strain
Immediate actions for overheating:
- Stop and cool down:
- Turn off and unplug immediately
- Allow to cool completely (30-60 minutes)
- Never continue using a machine that smells burnt
- Check for blockages:
- Examine the paddle and blade for stuck ingredients
- Ensure ventilation openings aren’t covered
- Review processing technique:
- Avoid processing extremely frozen mixtures
- Let bases thaw slightly before processing
- Don’t run multiple consecutive cycles without cooling
A burnt smell often indicates an electrical issue that may require professional attention. Contact Ninja Support and discontinue use if the smell persists.
Expert Tips and Ninja Creami Hacks – Solution
Take your frozen treats to the next level with these expert tips and clever hacks.
Recipe optimization:
- Perfect base ratios:
- For super creamy ice cream: 2:1 cream to milk ratio
- For protein-packed treats: substitute Greek yogurt for cream
- For lower-calorie options: use almond milk with cream cheese
- Texture enhancement:
- Add 1 tablespoon of alcohol to prevent over-freezing
- Include 1-2 tablespoons of corn syrup for a smoother texture
- Use dry milk powder to absorb excess water
Processing tricks:
- Two-stage freezing:
- Process once, return to freezer for 2 hours
- Process again for extra creaminess
- Strategic mix-in approach:
- Create layers rather than using the Mix-In function
- Process base, add half to the container, add mix-ins, add remaining base
- Gently swirl for professional marble effects
FAQs: Everything You Need to Know About the Ninja Creami
- Can I use dairy-free alternatives?
Yes, coconut milk, almond milk, and other plant-based milks work well. For best results, use full-fat versions and consider adding coconut oil for creamier texture.
- How long should I freeze the pint before spinning?
Freeze for at least 24 hours to ensure the mixture is thoroughly and consistently frozen throughout.
- Can I refreeze ice cream after spinning?
Yes, but the texture may become firmer. You may need to use Re-spin when serving again. Homemade ice cream is best consumed within 1-2 weeks.
- Why does my ice cream have a grainy texture?
Grainy texture typically comes from ice crystals. Ensure adequate fat content, process as soon as it’s fully frozen, and use Re-spin to break down crystals.
- Can I make sugar-free ice cream?
Yes, but use sugar alternatives that provide bulk, like erythritol, add extra fat, and consider using a small amount of xanthan gum as a stabilizer.
Conclusion:
The Ninja Creami truly revolutionizes homemade frozen treats, but like any kitchen appliance, occasional issues can arise.
From the ninja creami install light blinking to texture problems and mechanical issues, this guide has equipped you with the knowledge to tackle virtually any problem you might encounter.
Remember that most Ninja Creami issues have simple solutions – often it’s just a matter of proper assembly, allowing your mixture to thaw slightly, or making small adjustments to your recipes.
Taking the time to understand how your machine works and following the recommended guidelines for preparation will significantly improve your experience.
With the troubleshooting skills you’ve gained from this guide, your ice cream-making adventures can continue with fewer interruptions and more delicious results.
Keep this guide handy for quick reference, and don’t hesitate to contact Ninja Customer Support for persistent issues that aren’t resolved by these steps.
Here’s to many more batches of perfectly creamy, delicious frozen treats from your Ninja Creami!